Precision is the foundation of successful tube fabrication. Whether you’re building roll cages, exhaust systems, structural frames, hydraulic lines, or custom tubing assemblies, even small alignment errors can cause major issues.
Misaligned or curved tubes create fitment problems, weak welds, and inaccurate assemblies. That’s why many professional fabricators use a tube straightener or brake line straightener as a standard step in their workflow.
In this guide, we’ll explain why tube alignment matters, how tube straighteners work, and the best practices to achieve perfectly straight tubes before fabrication.
Why Tube Alignment Matters in Fabrication
Before diving into the how-to, it’s worth understanding the stakes:
- Fit & Gap Control
Misaligned or bowed tubes won’t mate cleanly to flanges, brackets, or mating parts. You’ll see gaps, misfit weld joints, or forced adjustments, undermining structural integrity and aesthetic quality. - Weld Integrity & Stress
If a tube isn’t aligned, your welds often end up under bending or torsional stress even before load is applied. That pre-stress can cause cracking, fatigue, or weak joints over time. - Dimensional Accuracy
Fabricated assemblies usually depend on tight tolerances. If one tube is bowed or misaligned, it throws off the geometry of the entire assembly. - Reduced Rework & Scrap
Catching alignment or curvature problems later can lead to scrapping parts or grinding and reworking. Straightening early saves time and material. - Professional Finish & Reputation
For shops doing high-end custom work, visible straight, clean tubes communicate quality. Every misalignment or twist is a mark of lower workmanship.
Given these consequences, consistent alignment is not optional, it’s essential.
The Role of a Tube Straightener (Brake Line Straightener)
A tube straightener (often also marketed as a brake line straightener when used in plumbing or brake tubing) is a tool designed to remove curvature, coil memory, or residual bends from tubing so that it is straight, true, and ready for precise bending or assembly.
Some key principles and functions:
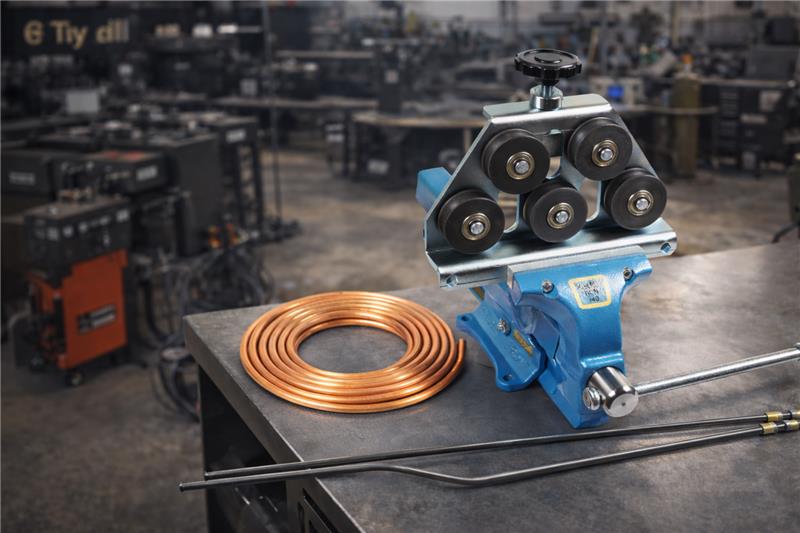
- Roller-based pressure & deflection: The tube is passed through sets of rollers that are adjusted so that the tube is forced to “relax” into a straighter profile. Woodward Fab’s blog explains how straighteners use paired rolls to apply both bend straightening and pressure straightening.
- Controlled plastic deformation: By slightly overstressing portions of the tube past its elastic limit, residual curvature is reduced.
- Ovality correction: Many straighteners also help remove ovality (flattening) introduced by bending or handling.
- Fine adjustment knobs: High-quality straighteners allow you to dial in the roll gaps to control how much straightening force is applied.
Used properly, a straightener helps start the tube in as close to “perfect” alignment as possible before any further bending or welding steps.
Step-by-Step: Achieving Perfect Tube Alignment
Here’s a suggested workflow to use a straightener (i.e., brake line straightener) to ensure your tubes are properly aligned before fabrication:
1. Inspect & Prepare Your Tube Stock
- Examine for major bends, kinks, or coil memory if the stock came in a roll.
- Clean off any burrs, sharp edges, or damage from handling that might interfere with rollers.
2. Set Up the Straightener
- Choose rollers/roll spacing appropriate for your tube’s outer diameter and wall thickness.
- Adjust the roll gaps so that the tube is slightly compressed (but not crushed), narrower than the nominal tube OD just enough to apply straightening pressure.
- Ensure roll axes are parallel and that the tool is properly anchored or rigid in its placement.
3. Feed the Tube through Carefully
- Insert the tube slowly and feed it through the rollers steadily, maintaining control and avoiding sudden jolts or side forces.
- For coiled tubing, straighten in passes, push-pull or back and forth, until residual curvature is removed.
- If your straightener allows, make incremental adjustments while the tube is passing to squeeze out remaining bend.
4. Verify Straightness & Correction
- After the tube exits, place it on a flat surface or use a straightedge to check for bowing or twist.
- Roll the tube and see if it rocks or touches in only a point (indicating curvature).
- If minor deviations remain, run it again or fine-tune roll settings.
5. Lock Tube Orientation / Mark Reference Lines
- Once the tube is straight, mark orientation or alignment reference lines (e.g. centerlines, bend start points) so subsequent bending or welding remains accurate.
6. Bend or Fabricate with Confidence
- When the tube is aligned, your bending, trimming, welding, and fitting steps are less error-prone.
- Because the tube starts straight, you minimize the need to compensate for pre-existing curvature.
Best Practices for Tube Straightening
- Don’t over-straighten: Applying excessive compressive force can flatten or distort the tube cross-section.
- Use gradual adjustments: Make small tweaks to roll gaps rather than dramatic changes in one pass.
- Control twist: Avoid torsion while feeding, which can introduce twist even while straightening.
- Support long tubes properly: Use stands or supports so the weight doesn’t sag after straightening.
- Re-verify after handling: Once the tube is moved or clamped, recheck straightness before final welding.
- Maintain rollers: Keep roller surfaces clean, smooth, and free from nicks that might scratch or deform tubes.
- Log settings: For repeated tube sizes or runs, record the roll gap and adjustment settings that produced good straightness, so you can reuse them next time.
Improve Fabrication Accuracy with the Right Tools
At Woodward Fab, we know precision matters. Our Tube Straighteners make aligning your tubing effortless, so every bend and joint starts from a perfect baseline. With adjustable designs for common tube sizes, you reduce defects, save time, and get repeatable, professional results. Plus, our guides and tips help you get the most out of every tool, making your fabrication faster, cleaner, and more reliable.

Related Post:
- Essential Workshop Tools for Professionals Working with Copper Tubes
- Calculating ROI on Sheet Metal Fabrication Equipment
- How to Choose the Right Deburring Tool for Your Application
- Sheet Metal Bend Radius: The Key to Durability
- Innovations in Small Tube and Pipe Bending are Shaping the Future of Fabrication